LiveContainer + SideStore
This version of LiveContainer comes with a built-in SideStore, which allows you to refresh LiveContainer and other apps using only one of your 3 free app slots.
You can install this version through Impactor, iloader, or an existing standalone SideStore.
If you're installing LiveContainer+SideStore on a Windows PC, you need to download iTunes so your sideloader can use the drivers for interacting with Apple devices.
Connect your device to your computer and trust it before you start
Downloads
Please download the LiveContainer + SideStore .ipa file first:
| Stable | Nightly |
|---|---|
 | |
Method 1: Impactor
Impactor (previously known as Plume Impactor) is a cross-platform, modern sideloader developed by khcrysalis. Impactor will automatically addes increased-memory-limit and HealthKit related entitlements to LiveContainer.
- Download the correct version of Impactor from GitHub based on your OS and architecture. Note that we're downloading "Impactor", not "plumesign".
- Install and open Impactor.
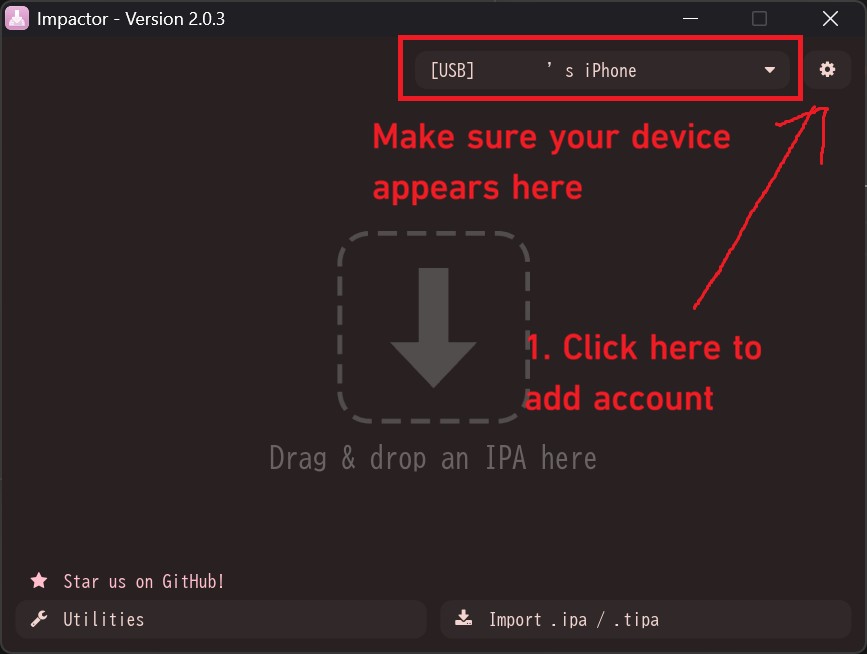
- Make sure your device appears in the top right corner. If not, check the note above or use another USB port/cable.
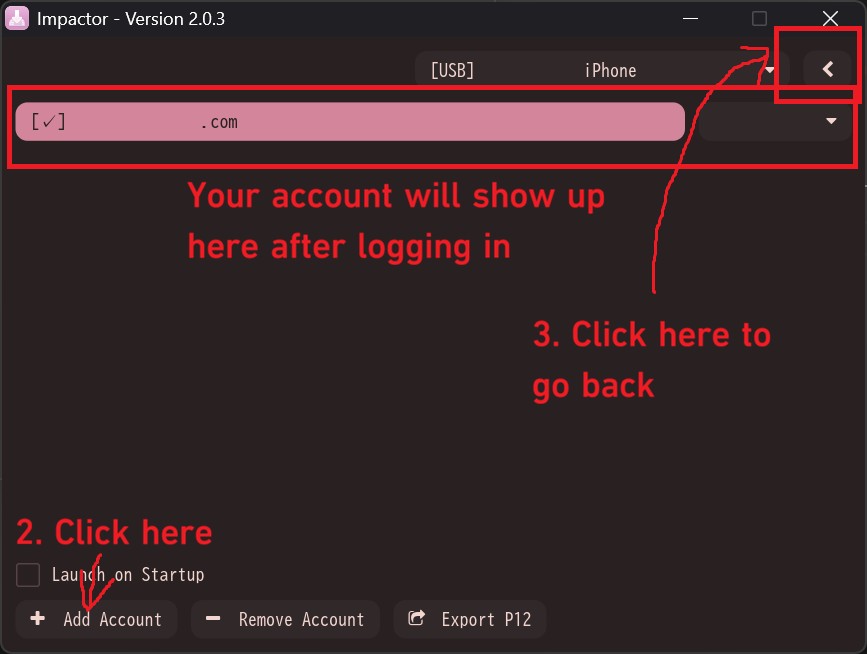
- Click the settings (gear) icon, then click "Add Account" to sign in with your Apple ID. For any sign-in issues, please refer to here or contact Impactor's developer.
- Tap the back button.
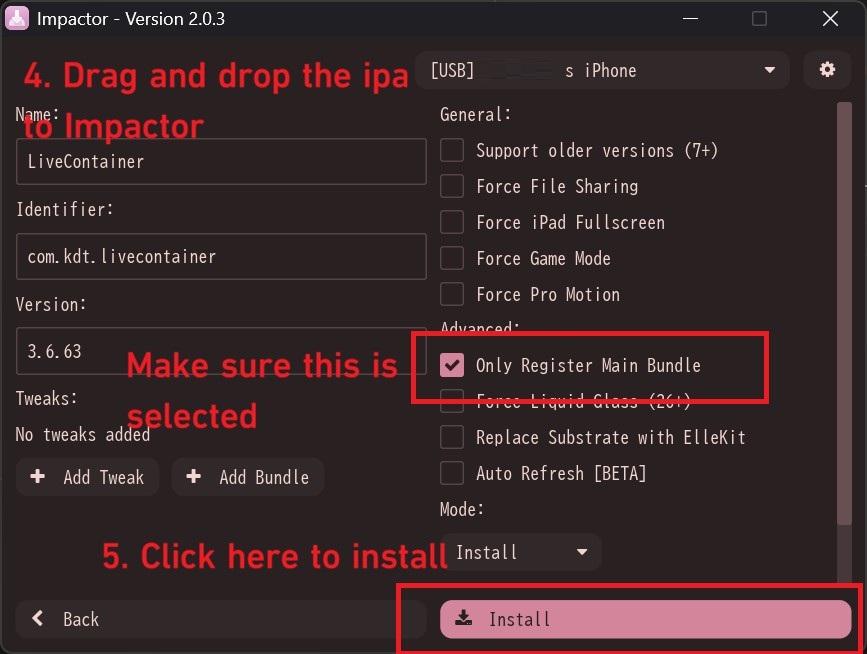
- Drag and drop the LiveContainer + SideStore .ipa file into Impactor.
- Make sure "Only Register Main Bundle" is selected.
- Click "Install"
- Go to iOS Settings App -> General -> VPN & Device Management and verify LiveContainer
- Go to the Setup after Installing section to complete LiveContainer and SideStore's setup.
Method 2: iloader
Please make sure to use the latest iloader, as previous versions cannot correctly sign LiveContainer.
iloader is a cross-platform, modern Sideloader developed by nab138.
You can follow SideStore's installation guide to install LiveContainer+SideStore. Just click "LiveContainer+SideStore" instead of "SideStore" when selecting the app to sideload.
After installing, go to the Setup after Installing section to complete LiveContainer and SideStore's setup.
Method 3: Standalone SideStore
You can also migrate from a standalone LiveContainer and SideStore setup to the LiveContainer + SideStore setup, which saves you one free slot for other apps or another LiveContainer.
You can simply install the LiveContainer + SideStore .ipa file in the standalone SideStore. This works like an upgrade, so all your data will be preserved. When installing, be sure to select "Keep All Extensions (Use Main Profile)". After setting up the built-in SideStore, you can remove the standalone SideStore.
After installing, go to the Setup after Installing section to complete LiveContainer and SideStore's setup.
Setup after Installing
Once LiveContainer+SideStore is installed, you need to import the certificate from SideStore so LiveContainer can also sign apps.
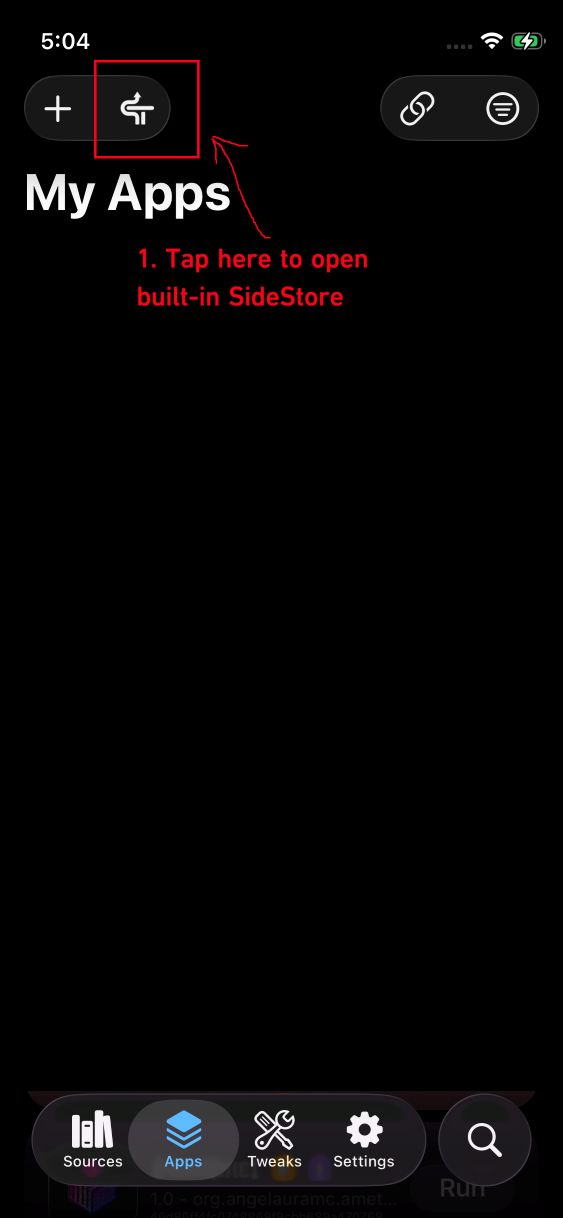
- Open SideStore using the SideStore button in the top left corner of the "Apps" page.
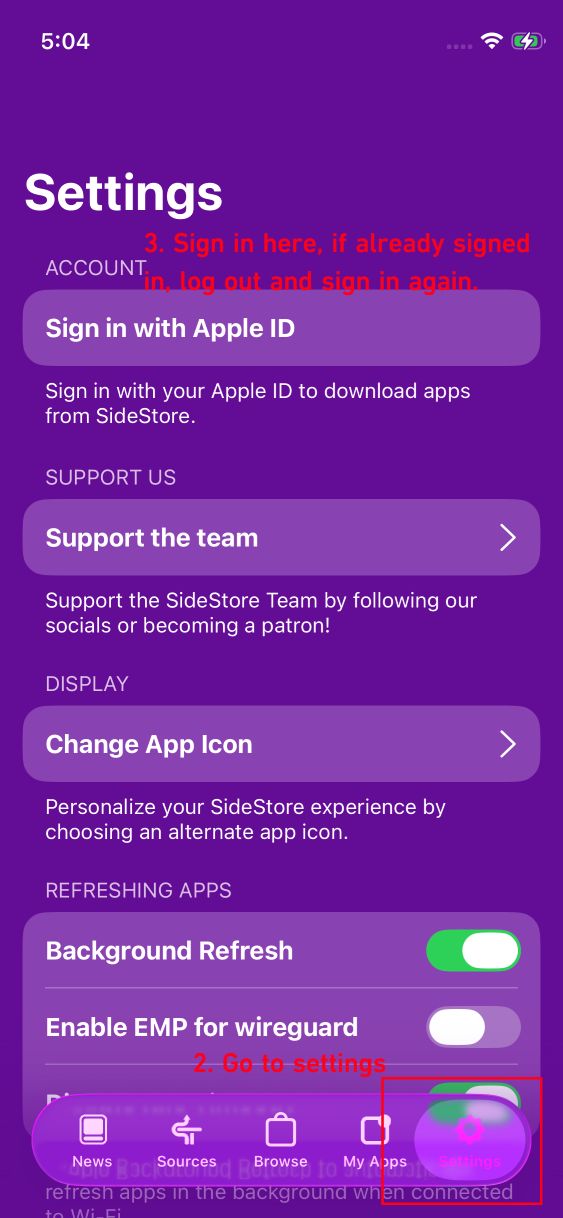
- Go to SideStore's settings and log in. If you previously had SideStore installed, you might find yourself already logged in, but since the built-in SideStore cannot retrieve your credentials, please log out and sign in again.
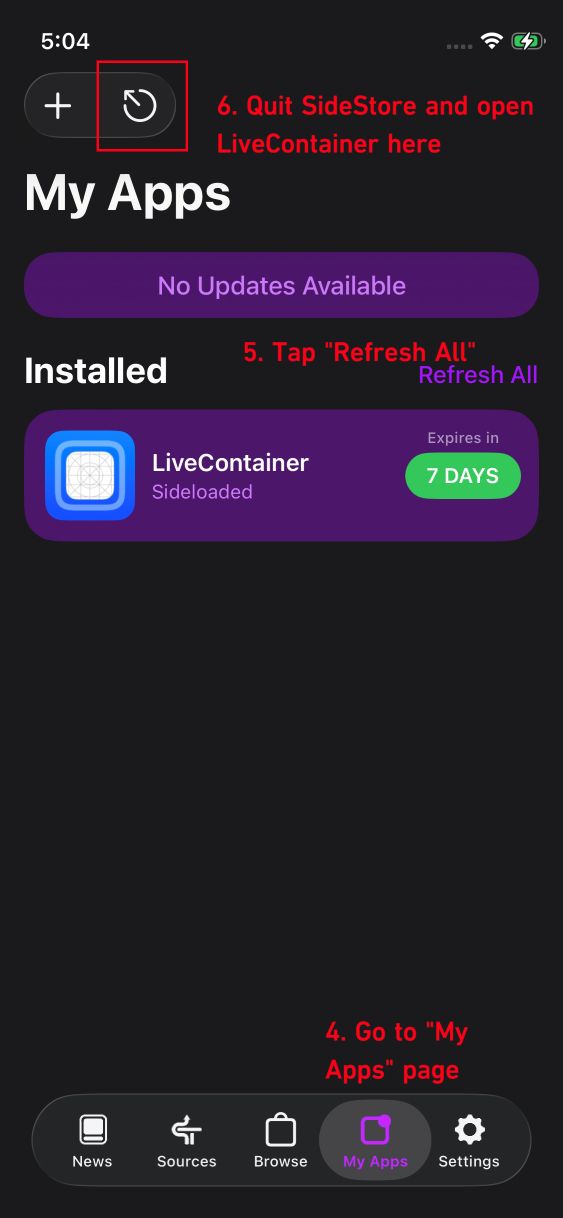
- Connect to LocalDevVPN, go to "My apps" page and tap "Refresh All"
- Quit SideStore and open LiveContainer. You can do this by either tapping the "quit" icon in SideStore's Apps page or using the app switcher.
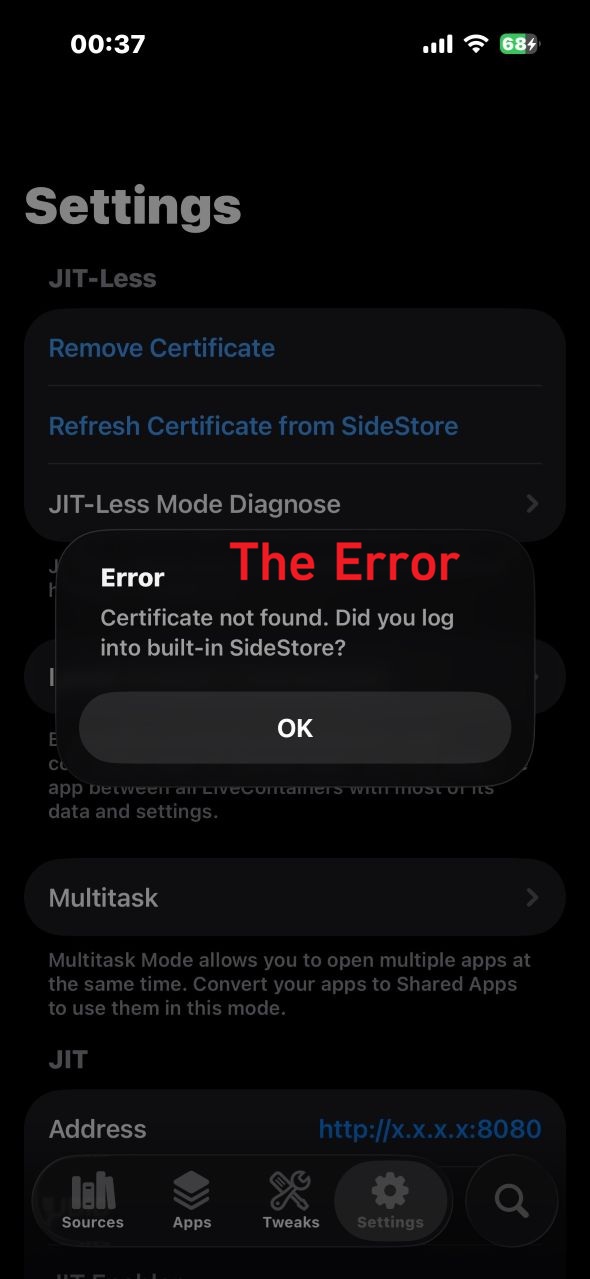
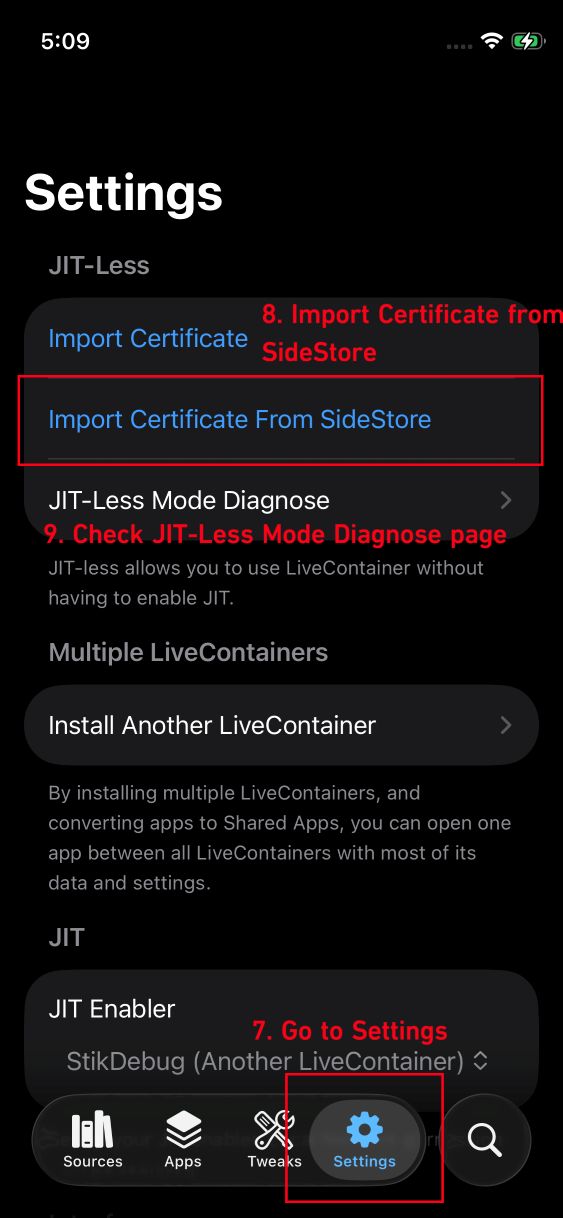
- Go to LiveContainer's settings, tap "Import Certificate from SideStore", and tap "OK".
- If the "Import Certificate" button changes to "Remove Certificate", the certificate has been imported. You can check the "JIT-Less Mode Diagnose" page to verify that everything is configured correctly.
- (Optional) Check if Refresh is Successful
Auto-Refresh Shortcut
You can use the auto-refresh shortcut just like you would with the standalone SideStore—simply replace SideStore's "Refresh All Apps" action with LiveContainer's.
Troubleshooting
If you see the error "Certificate not found, did you log into built-in SideStore?" and you are confident that you did the above steps correctly, it's probably a SideStore side issue that we haven't figured out, but you can try the following workaround.
- Open built-in SideStore, go to Settings, and scroll down.
- Tap "Export Signing Certificate..."
- Choose a password for the exported certificate and save it on your device
- Exit built-in SideStore and reopen LiveContainer.
- Go to Settings, tap "Import Certificate", tap "OK"
- Select the certificate you just exported, and type the password you chose
- You can check the "JIT-Less Mode Diagnose" page to verify that everything is configured correctly.